一般图片圆角显示都是四个角都显示圆角,如果只有这个功能需求,采用常用的方法就可以了,也不用费那么多事情。但是在有些情况下需要只显示图片的2个圆角,就不太好实现了。
先看效果图 ,未做圆角转换的图片

做了4个角的圆角转换的图片

只做了下面2个圆角转换的图片

如何实现画四个方向的弧线呢?
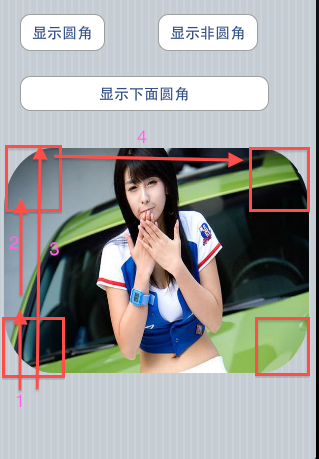
先看看示意图
头文件
#import<Foundation/Foundation.h>
typedefenum{
UIImageRoundedCornerTopLeft=1,
UIImageRoundedCornerTopRight=1<<1,
UIImageRoundedCornerBottomRight=1<<2,
UIImageRoundedCornerBottomLeft=1<<3
}UIImageRoundedCorner;
@interfaceUIImage(Utility)
//+(void)addRoundedRectToPath(CGContextRefcontext,CGRectrect,floatradius,UIImageRoundedCornercornerMask);
-(UIImage*)roundedRectWith:(float)radiuscornerMask:(UIImageRoundedCorner)cornerMask;
@end
实现文件
#import"UIImage+Utility.h"
//UIKit坐标系统原点在左上角,y方向向下的(坐标系A),但在Quartz中坐标系原点在左下角,y方向向上的(坐标系B)。图片绘制也是颠倒的。
staticvoidaddRoundedRectToPath(CGContextRefcontext,CGRectrect,floatradius,UIImageRoundedCornercornerMask)
{
//原点在左下方,y方向向上。移动到线条2的起点。
CGContextMoveToPoint(context,rect.origin.x,rect.origin.y+radius);
//画出线条2,目前画线的起始点已经移动到线条2的结束地方了。
CGContextAddLineToPoint(context,rect.origin.x,rect.origin.y+rect.size.height-radius);
//如果左上角需要画圆角,画出一个弧线出来。
if(cornerMask&UIImageRoundedCornerTopLeft){
//已左上的正方形的右下脚为圆心,半径为radius,180度到90度画一个弧线,
CGContextAddArc(context,rect.origin.x+radius,rect.origin.y+rect.size.height-radius,
radius,M_PI,M_PI/2,1);
}
else{
//如果不需要画左上角的弧度。从线2终点,画到线3的终点,
CGContextAddLineToPoint(context,rect.origin.x,rect.origin.y+rect.size.height);
//线3终点,画到线4的起点
CGContextAddLineToPoint(context,rect.origin.x+radius,rect.origin.y+rect.size.height);
}
//画线4的起始,到线4的终点
CGContextAddLineToPoint(context,rect.origin.x+rect.size.width-radius,
rect.origin.y+rect.size.height);
//画右上角
if(cornerMask&UIImageRoundedCornerTopRight){
CGContextAddArc(context,rect.origin.x+rect.size.width-radius,
rect.origin.y+rect.size.height-radius,radius,M_PI/2,0.0f,1);
}
else{
CGContextAddLineToPoint(context,rect.origin.x+rect.size.width,rect.origin.y+rect.size.height);
CGContextAddLineToPoint(context,rect.origin.x+rect.size.width,rect.origin.y+rect.size.height-radius);
}
CGContextAddLineToPoint(context,rect.origin.x+rect.size.width,rect.origin.y+radius);
//画右下角弧线
if(cornerMask&UIImageRoundedCornerBottomRight){
CGContextAddArc(context,rect.origin.x+rect.size.width-radius,rect.origin.y+radius,
radius,0.0f,-M_PI/2,1);
}
else{
CGContextAddLineToPoint(context,rect.origin.x+rect.size.width,rect.origin.y);
CGContextAddLineToPoint(context,rect.origin.x+rect.size.width-radius,rect.origin.y);
}
CGContextAddLineToPoint(context,rect.origin.x+radius,rect.origin.y);
//画左下角弧线
if(cornerMask&UIImageRoundedCornerBottomLeft){
CGContextAddArc(context,rect.origin.x+radius,rect.origin.y+radius,radius,
-M_PI/2,M_PI,1);
}
else{
CGContextAddLineToPoint(context,rect.origin.x,rect.origin.y);
CGContextAddLineToPoint(context,rect.origin.x,rect.origin.y+radius);
}
CGContextClosePath(context);
}
@implementationUIImage(Utility)
-(UIImage*)roundedRectWith:(float)radiuscornerMask:(UIImageRoundedCorner)cornerMask
{
UIImageView*bkImageViewTmp=[[[UIImageViewalloc]initWithImage:self]autorelease];
intw=self.size.width;
inth=self.size.height;
CGColorSpaceRefcolorSpace=CGColorSpaceCreateDeviceRGB();
CGContextRefcontext=CGBitmapContextCreate(NULL,w,h,8,4*w,colorSpace,kCGImageAlphaPremultipliedFirst);
CGContextBeginPath(context);
addRoundedRectToPath(context,bkImageViewTmp.frame,radius,cornerMask);
CGContextClosePath(context);
CGContextClip(context);
CGContextDrawImage(context,CGRectMake(0,0,w,h),self.CGImage);
CGImageRefimageMasked=CGBitmapContextCreateImage(context);
CGContextRelease(context);
CGColorSpaceRelease(colorSpace);
UIImage*newImage=[UIImageimageWithCGImage:imageMasked];
CGImageRelease(imageMasked);
returnnewImage;
}
@end
实现方法如下:
-(IBAction)showRectImage
{
UIImage*rectImage=[UIImageimageNamed:@"test.jpg"];
self.imageView.image=rectImage;
}
-(IBAction)showRoundImage
{
UIImage*rectImage=[UIImageimageNamed:@"test.jpg"];
UIImage*roundImage=[rectImageroundedRectWith:100
cornerMask:UIImageRoundedCornerBottomLeft|UIImageRoundedCornerBottomRight|UIImageRoundedCornerTopLeft|UIImageRoundedCornerTopRight];
self.imageView.image=roundImage;
}
-(IBAction)show2RoundImage
{
UIImage*rectImage=[UIImageimageNamed:@"test.jpg"];
UIImage*round2Image=[rectImageroundedRectWith:100
cornerMask:UIImageRoundedCornerBottomLeft|UIImageRoundedCornerBottomRight];
self.imageView.image=round2Image;
}
对于四个角,用下面的角进行逻辑或的方法。
UIImageRoundedCornerTopRight
UIImageRoundedCornerTopLeft
UIImageRoundedCornerBottomRight
UIImageRoundedCornerBottomLeft
项目文件下载
参考URL
http://stackoverflow.com/questions/4847163/round-two-corners-in-uiview
http://stackoverflow.com/questions/4845211/just-two-rounded-corners
http://blog.sallarp.com/iphone-uiimage-round-corners/
本文出自 “人生得意须尽欢” 博客,请务必保留此出处http://no001.blog.51cto.com/1142339/637732
分享到:


相关推荐
IOS圆角和阴影处理,以一张图片为例子 注释清晰,方便新手学习
iOSUIImage 的1、毛玻璃效果。 2、填充效果,......8种效果展示
最近看了不少设置圆角图片的干货,才把项目里设置 layer.cornerRadius 地方给替换了,自己写的用 SDWebImage下载完图片后,用 Quartz2D 裁剪图片成圆形,然后给 imageView 显示,拖动表格时不加载图片,拖动停止才显示图片...
大家都知道在iOS中为UIView添加阴影还是比较简单的,只需要设置layer的shadow属性就可以了,但是问题在于设置阴影之后,必须设置masksToBounds为NO,而圆角图片则要求masksToBounds必须为YES,两者相互冲突,会导致...
图片选择_拍照或选择本地_仿ios.zip,太多无法一一验证是否可用,程序如果跑不起来需要自调,部分代码功能进行参考学习。
仿IOS的圆角设置界面。直接可用,单选多选等
iOS中很多时候都需要用到指定风格的圆角按钮,以下是UIButton提供的创建圆角按钮方法 设置按钮的4个角: 左上:UIRectCornerTopLeft 左下:UIRectCornerBottomLeft 右上:UIRectCornerTopRight 右下:...
IOS圆角模糊风格UI界面源码(PSD+Exdui源码)。
源码SkyRadiusView,实现view背景色的四个边角自定义成圆角 ...使用方法很简单,只需要在xib或StoryBoard中继承SkyRadiusView,并设置参数即可 详情请参考项目中的示例代码 和 gif图片 测试环境:Xcode 6,iOS 7.0以上
仿支付宝卡包,图片圆角带阴影
lcp_down:根据当前元素的圆角设置反应到按触效果层 lcp_down2:以5px的圆角设置反应到按触效果层 lcp_down3:以50%的圆角设置反应到按触效果层 方法调用 third 调用方法对使用了lcp_down的class进行事件绑定。 该...
ZLPhotoBrowser 为一个相册多选框架,pod 2.4.2 新增视频编辑功能 ... 具体使用方法访问github链接 所支持功能如下: ... 预览快速选择、可设置预览最大... 相册内图片自定义圆角弧度 自定义升序降序排列 多张拍照
ios移动平台开发\万花筒是一个通过修改图片尺寸,旋转角度,亮度,按钮的圆角半径和图像视图的圆角半径从而得到更好的特效效果,更加的炫酷,从而得到大量使用。
5张SDK使用说明图片) 用法: 请直接把“SDK”文件夹拖到您的项目中,然后安照demo代码应用SDK即可,不明白请联系我们 注意1: 项目中有多个倒计时按钮,那么必须给按钮“indexsButtonLDS”设置不同的标识符(任意...
SDK提供有比较灵活的属性控制,可修改倒计时按钮背景颜色、文字颜色、按钮圆角大小、点击时背景颜色,基本能满足全部UI设计需求。请下载资源包里面提供了SDK的用法截图、Demo、SDK(务必注意看看 5张SDK使用说明图片)...
iOS二维码的创建,及个性化:修改颜色、添加中心圆角图片(类微信二维码)
8.自定义是否显示进度条终点的小圆点及自定义它的图片。`showPoint`、`pointImage` 9.自定义进度条两端是否是圆角样式。 10.自定义是否动画、是否从上次进度开始动画、每次动画的时长是相等还是进度越大动画越长。...
作者bestswifter,源码MySampleCode,这是我的博客中:iOS高效添加圆角效果实战讲解一文的 demo,据说...有些图片设置圆角会导致离屏渲染,有些则不会。即使四个图片都导致了离屏渲染,也并没有看到滑动时帧数的下降。
优点: 1.可将多张小图解码后存储到同一张大图上,在同屏渲染多图时,效率极高; 2.支持mmap内存映射,高效的I/O操作,减少一次文件拷贝...4.支持图片绘制圆角,并避免调用( layer.cornerRadius; layer.masksToBounds)
经常看到各种高效裁剪圆角的文章,正好之前做过一点数字图像处理,所以写个裁剪圆角的算法,下面这篇文章主要给大家介绍了关于iOS实现高效裁剪图片圆角算法的相关资料,文中通过示例代码介绍的非常详细,需要的朋友...